

The Latest


Understanding Value Creation in Printmaking
It used to be that all photographs were prints. Today, however, most photographers no longer print their work, and printing is too often dismissed as unworthy of a ‘serious’ artist. Yet understanding the full chain of value creation in printing could change how prints are seen and valued—by collectors and photographers alike.
Sometimes talking about printing with other people reveals how little most people understand about the process of making a good print. Somewhere along the line, photography and print became blurred into a single idea. It used to be that all photographs were prints—there was no other way, and the words photography and print were interchangeable. Photography meant print. Period. Today billions of digital images are created each day, yet only a tiny fraction ever make it as prints, and those few that do, often end up as prints stuck to a fridge.
And this attitude isn’t limited to casual viewers—many photographers themselves no longer print their work or even see the point in trying. Too often, printing is dismissed as trivial, unworthy of a “serious” artist. Part of the blame lies with printer manufacturers and their decades-long marketing campaigns. We’ve been led to believe that printers are smart, almost magical machines: buy one, press a button, and a flawless print appears. Yet, anyone who has actually used a printer knows it’s nothing like that. You might get is a print, but it will not be what you’ve expected to see at all.
The truth is that a print is never simply ‘pressed out’ of a printer. A printer is a dumb machine: it knows nothing about the image it is producing, the paper it is using, the conditions in which it will be viewed, or whether the artist wants it more vivid, softer, or higher in contrast. It has no understanding of whether it is printing a volcanic landscape in Iceland or a cat. All of this must be decided and set by the printmaker. That’s why the same printer can produce a brilliant print in one person’s hands and a muddy, lifeless one in another’s. The artistry lies not in the machine but in the judgment and knowledge of the person guiding it.
The other reason for lack of understanding is the rise of fulfillment services with their enticing promise: “Just send us your file and we’ll ship the print to anyone, anywhere.” It’s a good pitch that many photographers fall for, but the product often falls short. The artist has no control, no visibility over what the customer receives, and the customer - believing the print came directly from Photographer X - rarely questions the quality. And without strict quality control - a print is no better than a poster. It is treated as a commodity and inevitably becomes one.
Printing is part of a larger act of translation. It starts from reality translated to a two-dimensional digital image, and back again into a physical object on paper as a print. Every stage of that translation requires both technical skill and artistic judgment. Every print carries the hand of the maker in every decision, and there is real art in that. And of course, none of it would matter without a strong image to begin with.
And here lies the paradox: the better the image and the better the print, the less visible the expertise behind it becomes. Canon and Epson understand this well, which is why they employ armies of brand ambassadors—photographers with strong source material whose work can be translated seamlessly into brilliant prints. That invisibility of labor and effortless success is one reason why prints are so often undervalued compared to drawings or paintings. People know far more about painters, paints, and their struggles than they do about photographers and printing challenges.
Yet understanding the full process might change how prints are seen. If more people grasped what goes into each print, more would value them, recognize them as art, and perhaps even fall in love with them. It is for this reason that I’ve written this guide. What follows is not a universal formula but a map—a sequence of five stages that begins with importing files from a shoot and ends with the framed artwork. Not every photographer follows all of them. Some stop at step1 or 3, others outsource certain steps in between. What matters is that each stage involves conscious choices, and those choices shape both the final result and the value of their art.

A high-level overview of the complete printing process.
Step 1: Selection
The first step is about narrowing down the images into a strong set of candidates for print. Most photographers are used to culling—sorting through and selecting their best shots—but evaluating with print in mind adds another layer. It’s no longer just about asking which images look great on a screen, but which ones will hold their strength on paper. Which images will look good on a wall? Which will stand the test of time?
This is also the stage where the selected files are batch-processed and given a first round of editing in software such as Lightroom: correcting white balance, adjusting the histogram, straightening, cropping, and removing obvious distractions. More detailed local edits, like skin retouching, are usually left for later steps.
To make this more concrete, let me give you an example. After a day of shooting I might come back with 2,000–3,000 images. Through several rounds of sorting, I cut about 90%, which leaves me with roughly 200 images. I process these in Lightroom, export them, and refine the selection again, this time with print in mind. At that stage, I might select only 30–50% as candidates for printing. Before moving on, I also try to form an idea of what kind of print each image might become - whether it’s something small, large, or better suited for an alternative process.
Step 2: Printing
Once images have been selected for printing, the next decision concerns how to produce them. This stage is often what people imagine when they think of “printing”: choosing the paper, the size, printer settings, and managing color. Most literature and workshops focus almost entirely on this step. Yet inkjet printing at home is not the only option. Options range from printing at home, sending files to a professional lab, or preparing digital negatives for alternative processes. Professional labs typically offer a far wider range of materials and the ability to produce larger sizes. They are also specialists in their offerings—papers, aluminum plates, acrylic glass, wood, canvas.
Paper choice introduces another layer of complexity to navigate. In an ideal world, one might print each image on every type of paper and at multiple sizes, then evaluate which combination works best. Reality, however, makes that impossible. Few can afford to test every option, which is why experience and competence are essential: they save both money and time while selecting the best medium for each image.
Knowing the intended use of the print—personal display, a gift, an exhibition piece, or a print for sale - influences which paper is most appropriate. Each scenario has different requirements and expectations. Conservation aspect is critical for prints intended for sale. Cotton-based papers are archival and long-lasting, but more expensive; wood-pulp papers are cheaper but less durable, yet perfectly fine for home prints where cotton based papers will be on overkill.
Example: From 100 candidates selected in the previous step, I will print 15–20 small 10×15 prints on different paper types. This first round eliminates weaker images and highlights the most suitable papers. The strongest 50 might then be printed at 10×15, from which around half are chosen to test at A4. At this size, flaws become more visible: focus issues, subtle distractions, or tonal imbalances that were not obvious at smaller scales. Some images return to Photoshop for correction and local edits before being reprinted. From the A4 prints, perhaps half progress to A3 prints. By the time printing reaches A2, only a handful images will remain. Many images have natural size limits: they work at 10×15, remain strong at A4, but begin to collapse at A3 or beyond. For an artist, it’s essential to know the point at which an image starts to degrade—and never offer prints beyond that threshold. Today’s AI upscaling tools can extend resolution, but resolution is not the real issue. What matters is how busy, engaging, and interesting the image remains at scale. The human eye adapts quickly: what looked striking when first seen at scale can become visually monotonous once the initial “wow” factor fades. That’s why painters and printmakers have long thought about “viewing distance” and “scale integrity”—the ability of a work to keep rewarding attention at different distances and over time.
In this workflow, my home printer capable of A2 is sufficient for most prints. Anything larger is sent to a professional lab. I have already printed an image in A3/A2 size and know that the image can hold its strength at larger size. Without this initial testing, ordering directly from a lab can feel like a gamble - you can never know what you’ll get back.
Step 3: Post-Print Modification
This stage is often overlooked, yet it opens an entire world of possibilities. A print doesn’t have to be “finished” once it leaves the printer. It can be toned, hand colored, overprinted, aged, or cropped. Gloss layer can be added to matte prints, or matte applied to glossy. Creativity is the only limit here. Post-print interventions have a long tradition in art photography and printmaking. Photographers and printmakers have often modified their work after printing to add uniqueness or character.
The reason many photographers skip this step today is simple: post-print processing is not part of the traditional photographic workflow or education. To do it well requires multidisciplinary knowledge, something few photographers possess. Broadly, these interventions fall into two categories: freehand modification and full-image manipulation.
Freehand modification includes drawing or painting directly onto the print. This demands a clear understanding of how different media interact with paper and ink: acrylic, oil, watercolor, inks, as well as the tools—brushes, markers, cotton swabs. It requires knowledge of color theory, blending, and application. Full-image manipulations, by contrast, are less demanding of artistic draftsmanship. Techniques like toning or second exposures rely more on chemistry and process than on hand and brushwork.
With post processing 10 identical inkjet prints can become 10 very different art objects. That’s what gives this step its creative potential: it breaks the idea of the print as a fixed, endlessly repeatable object. If two photographers print the same file, they will produce nearly identical images. But once post-print processing enters the equation, those same prints may diverge completely—each bearing the unique mark of its maker.
Example: I have toned prints in coffee, hand-colored with acrylics, watercolors, and inks, aged with heat or water. Of course, digital tools can replicate some of these effects, but the point here is not consistency—it is uniqueness. Each intervention adds individuality. It isn’t scalable, and from a business perspective it may not be efficient, but as a creative step it transforms a print into something truly unique.
Step 4: Matting
Matting is often dismissed as something outside the printing process. It is seen as uncreative, something to skip entirely or outsource to a framer. But this could not be further from the truth—matting is the step that transforms a sheet of paper into a work of art. Done well, matting elevates a print from paper into something special. It becomes a permanent part of the artwork, not just a decorative border.
Matting is both perception and preservation. Think of packaging: the way a product is wrapped and presented shapes how we value it. Matting functions the same way for a print—it frames the image, sets the stage, and creates the context in which it will be seen. At the same time, mats create a physical barrier, protecting prints from touching the glass, from fingerprints, and from environmental wear.
The obvious question is then - if standard mats are available everywhere, why bother making your own? The answer is that doing it yourself teaches you about your images. Cutting and fitting mats builds an eye for proportion, balance, and how presentation changes meaning. Custom mats give you full control over framing, and the difference is immediately visible. This knowledge also makes you a better judge when you order matt services form someone else. With large editions, economies of scale inevitably demand outsourcing and uniformity, which dilutes the sense of uniqueness collectors value. Historically, this is exactly why smaller editions with visible signs of craft command higher prices.
Example: For me, matting is the ultimate commitment to the print: dressing it to impress, making it truly unique. I often cut and paint my own mats, experimenting with non-standard window ratios. This gives me complete control over how the print is presented.
Of course, practicality has limits. If I had to produce 50 or 100 identical mats, I would outsource them to a framer with cutting machines—after first designing the mat myself. There is no need to manually create 50 identical mats, but designing the first one by hand is invaluable process. Outsourcing only makes sense once I already know what I want. It is like a designer who spends months creating a chair or a dress but once the winning design is found, it can be reproduced in a factory on a mass scale and at a fraction of a cost.
This is also why I resist producing large editions in principle. With 10–15 prints, every copy can be made by hand. With 50 or 100, the pressure to automate and outsource grows, and the collector ends up with something less personal. A small edition means I spend far more time on each print than someone who is using a print fulfilling service. That additional time is my investment in the “best print” for the most demanding collector and it is why my prints are priced higher.
Step 5: Framing
Up to this stage the process has taken a digital file and turned it into a physical print on paper. Mixed artistic skills may then be applied to modify the print, and matting gives it both presentation and protection. Framing is the final step in this interdisciplinary process.Framing determines how an artwork will live in the world. It is what separates a poster from art. The same image, unframed, can feel casual or temporary; once framed, it gains weight, permanence, and status. That’s why even inexpensive prints or posters look “upgraded” when placed behind glass in a proper frame.
Framing is both protection—against dust, moisture, pollutants, and UV light—and the permanent home for a print. Creatively, it is also one of the most open-ended steps, capable of either elevating or undermining a piece. As the saying goes, bad framing kills great art. The framing options are nearly endless: materials, colors, sizes, depths, glazing.
The choice of frame depends on the type of print and where it will hang. Where will it be displayed? What color are the walls? What else will share the space? What kind of glass does it need—or should there be no glass at all? An artwork never lives in isolation; it is in constant dialogue with its surroundings, and the frame is what facilitates that dialogue. Museums and collectors invest in framing not only for its appearance but also to safeguard a work’s lifespan. For rare or valuable pieces, conservation framing is worth the investment, with museum-grade materials that protect a print for generations.
Today most people settle for thin, industrial metal frames. They are stylish, functional, and draw little attention to themselves. But historically, frames were treated as an art form in their own right—often inseparable from the artwork. That doesn’t mean a print today needs an ornate Rococo frame, but it does mean there is creative potential here. With modern 3D printing, and with skill in wood or metal work, highly sophisticated frames can be made today.
Ready-made frames are often sufficient, but custom framing is a completely different undertaking. A skilled framer blends craftsmanship with design and conservation knowledge, often advising on interior presentation as well as technical protection. Even a quick visit to a local frame shop reveals hundreds of possible custom frames—an easy way to see how different choices might reshape the way a print is perceived.
Example: I rarely ship framed prints. Framing is highly personal and best left to the collector’s own preferences. For personal prints that I hang at home, I often use Nielsen or Halbe premium frames. They are high quality and allow for easy image swapping. The original glass can be replaced with UV-protective acrylic, which also makes the frame lighter. Sometimes I omit glass altogether, letting the print be touched and experienced directly. I’ve also experimented with painting white frames in other colors, using both sprays and markers.
Conclusion
The point of this guide and overview is to give a bit more understanding of the steps involved in printmaking, but also to highlight the difference between photographers who handle every stage themselves and those who do only a few and outsource the rest. In art, the story behind the work is often as important, and sometimes more important than the object itself. If the image alone were what mattered, high-quality reproductions would sell for far more than they do. What we truly value is the connection to the artist. That’s why signed prints, hand-modified works, or editions with COAs (Certificates of Authenticity) command higher value.
There is a big difference between buying a print that has been made and sent by the artist and buying one shipped directly from a fulfilment lab. Knowing that an artist has mastered matting or post-print modification techniques helps explain why such prints cost more than something fresh from the printer. Skills like matting, alternative printing, or hand-finishing require practice, which costs time and money. Each adds an extra layer of uniqueness to a print. But if the market only rewards cheap standard output, there’s little incentive for artists to develop or maintain these skills. The result is a race to the bottom, where the cheapest print wins. This is a real dynamic - the abundance of cheap prints and automated fulfillment has pushed down prices, making it harder for handcrafted or deeply considered prints and artists to compete. This trend helps no one: photographers cannot sustain themselves or refine their skills, and collectors end up with mediocre prints that carry little artistic weight. In such a scenario, the art print competes with a poster as disposable home décor.
This framework can also be applied to other roles to understand value-creating activities in the production chain. A lab, for instance, doesn’t need to engage in image selection—their expertise lies in how best to print what is sent to them. A framer doesn’t need to know the printing process, as their specialization is in matting, framing, and glazing. Each stage has its own craft, and recognizing this helps reveal the full value chain.

An example of a photographer whose engagement with an image ends after the printing stage, outsourcing the rest.

An example of a lab’s full-service offering - only what to print is selected by a customer.

An example of a framing store offering.
Guide to Quality and Size Options at NUDICCI
Whether you’re just starting out or building a serious collection, we have something to suit your needs. From affordable professional prints to high-end premium pieces. Every artwork is designed to cater to different spaces, tastes, and budgets. Read on to learn more…
Whether you’re just starting out or building a serious collection we probably have something for you. Our artworks are designed to cater to different tastes, spaces, and budgets - from affordable professional prints to high-end premium pieces.
Traditional online print stores offer many options to let you have your perfect print: sizes, papers, passepartouts, frames, and glass types. This level of customization may be reasonable and well-intended, but all too often, too many choices create an overwhelming and frustrating buying experience. The decision-making is detracting from the joy of acquiring art. We take a different approach: one print, one product. Each piece is designed to be its best version, freeing you from unnecessary decisions.
Our Philosophy
Our approach is simple: we limit artwork options to only the best, helping you focus on the art. Through hands-on experience, we know which sizes, materials, and formats suit each image best. We’ve tested them. We’ve evaluated their visual impact. If an image shines in 3 configurations, we present 3 distinct products. In developing this system, we made several assumptions. We assumed collectors have a clear budget and intent - whether they want a large or small print, a premium or standard quality print. That’s why we offer only a few quality and size levels for each print. Now, let’s dive into the details.
1.Quality Levels
We offer three levels of print quality: Silver, Gold and Platinum. The quality level is set by the final product - so it’s not just about the paper, inks, or sizes but how they come together that defines the rating. This system provides clarity to customers while allowing for subtle distinctions in quality and pricing.
• Silver (think “professional”): prints done on high-quality professional print papers.
• Gold (think “premium”): Premium quality with enhanced papers and paper materials with museum quality standards.
• Platinum (think “prestige”): Top-tier craftsmanship designed for serious collectors and exceptional presentations. Each print paper has its own story and legacy.
By clearly defining quality levels and setting expectations, we aim to help you narrow your choice.
SILVER-level. This level is the perfect starting point for exploring the world of fine art nude prints. This tier offers an excellent balance of quality and affordability. The prints deliver great image quality without the premium price tag associated with more sophisticated archival fine-art standards. Silver prints are crafted on high-quality, professional-grade photo paper commonly used in photo labs worldwide and include glossy, semi-gloss and matt papers. Inks used in this level may be either pigment or dye, providing vibrant colors and sharp details, though these prints are not archival and may fade faster then the Gold and Platinum levels.
Consider this level if:
You're new to art collecting and want an affordable starting point.
You’re looking for reliable, functional prints without the need for archival quality.
GOLD-level.This level represents uncompromised quality—it’s the pinnacle of what true art prints are meant to be. Prints in this category are crafted on archival-grade cotton or other natural acid-free papers, meeting the same rigorous standards used in galleries, exhibitions, and museums. These papers exude luxury, offering a tactile experience that enhances the artwork’s visual and emotional impact, elevating it to a masterpiece.
Archival materials are specifically engineered to protect the artwork from damage over time. Every component, from acid-free papers to precision mounting techniques, is designed to preserve the piece for decades. Archival mats and boards are made from high-quality cellulose fibers, free from lignin and acids, ensuring that discoloration and damage are avoided. Additionally, these materials resist fading and ink bleeding, maintaining the artwork’s integrity and vibrancy. This level provides maximum protection from both physical and chemical harm, allowing collectors to enjoy their art for generations.
Consider this level if:
You're a serious collector looking for archival quality that can last many generations .
You value luxurious materials like cotton, washi, bamboo, or textured papers.
You want your artwork to feel high-end and sophisticated.
PLATINUM-level. Prints at this level are made for those who want their art to make a bold, unforgettable statement. These striking limited editions use exceptional materials—aluminum, plexiglass, rare high-end papers—that elevate the image far beyond the ordinary. These pieces serve as striking centerpieces, elevating both your space and personal style, and leaving a lasting impression on anyone who sees them. But the real value isn’t just in the technique or the surface. It’s in the story. Platinum prints are stories on the wall. If you’re looking for a piece that feels like a true work of art, this is your tier. It’s about depth, uniqueness, and that undeniable wow that stays with you or your guests.
Paper prints in this tier are created using award-winning, premium papers made from luxurious materials such as cotton, bamboo, hemp, or Washi. These exceptional papers come in a variety of textures, ranging from aquarelle-like finishes to ultra-glossy surfaces, each offering a unique aesthetic and tactile experience that enhances and complements the artwork’s visual impact.
Prints in this category adhere to the highest archival standards, featuring acid-free matting and materials that ensure longevity. With a lifespan of up to 200 years without fading, these prints are ideal for serious collectors who value timeless quality and preservation. Perfect for those who demand nothing but the best.
Buy Platinum level if:
You are looking for a WOW visual and tactile experience but that also stands out as a genuine work of art.
Gold and Platinum level prints come with a Certificate of Authenticity, confirming their status as true art prints. Every element—paper, surface, sizing, aspect ratio, and passepartout—has been carefully chosen to work in harmony with the image, ensuring the highest quality and artistic integrity.

Comparison of Silver, Gold and Platinum tiers.
TIP: Much of what sets different paper qualities apart is the tactile experience—how the paper feels in your hands. That’s hard to convey online. That’s why we offer sample packs, where the same image is printed on various papers, so you can compare and feel the differences for yourself. Currently, we offer Silver and Gold tier samples. There’s no Platinum sample for now, as Platinum is more about the uniqueness of each piece than a specific material.
2.Sizing Options
We offer everything from small 10x15 cm prints you can tuck into a drawer, to large statement pieces designed to dominate your wall. It’s important to know the exact size you’re purchasing, so we try to base our sizing on the ISO 216 system, where each next size level doubles the dimensions of the previous one. So for example A3 is double in size of A4, and A2 is equal to two A3s.
The sizes refer to the dimensions of the the printed area itself. For example, a 10x15 cm print (size XS) may be both a single A6 print or mounted in A5 frame. Typically, the passepartout is one size larger than the print—A6 is matted into A5, A5 into A4, and so on. This approach gives the image room to breathe and creates a clear separation from the background of the wall, enhancing its visual impact.

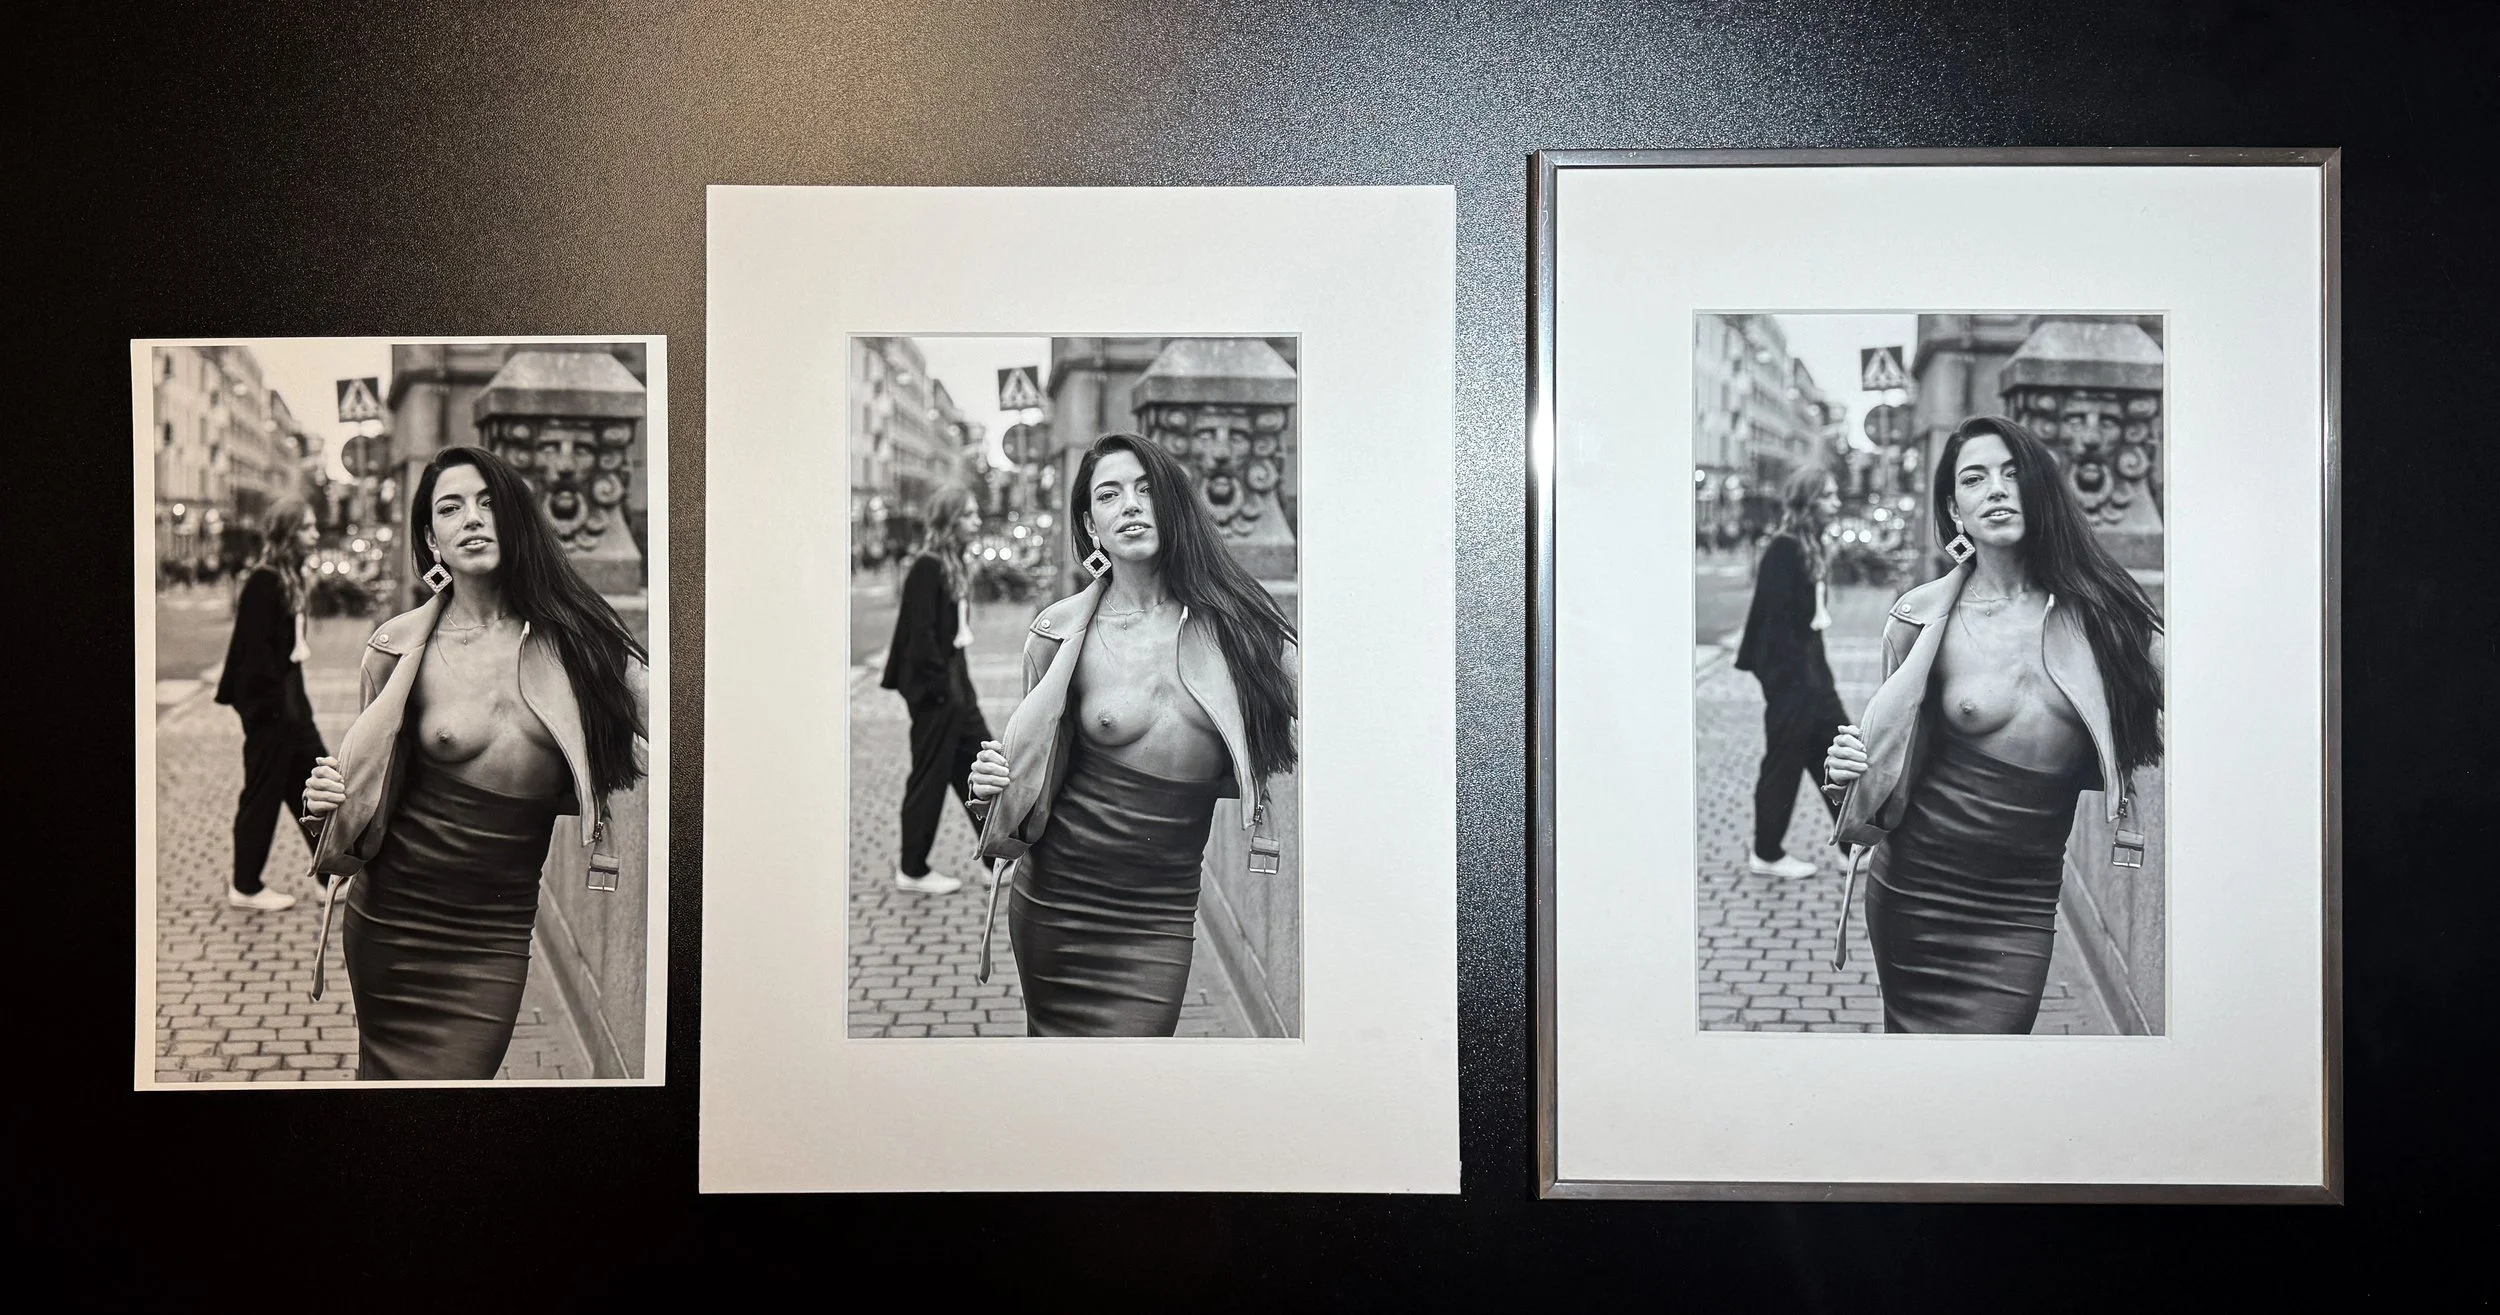
The same image is printed in six different sizes, from A6 to A1. Note that these dimensions refer to the unmounted print size; once matted and framed, the final presentation can take up to 50% more space (think S-print mounted in M-frame, M into L and so on).
Here’s a breakdown of the different sizes we offer, and how they might fit your needs.
XS/A6 (up to 10x15 cm or 4x6 inches): These tiny prints come either framed in a passepartout or as singles. They’re easy to store, fit into standard photo albums, and are perfect for displaying on a desk or bookshelf. If you’ve never bought an art print before, this size is a good way to dip your toes into the world of prints. You can even buy packs with different paper types to get a feel for each one.
S/A5 (15cm baseline: 15x20 cm, 15x15 cm, 13x18 cm): These prints are about twice the size of XS, but still small enough to fit almost anywhere at home. As the image size increases, you start to see more details, and the paper itself plays a bigger role in how the print looks and feels.
M/A4 (20cm baseline such as 20x30 cm, 20x20 cm, 20x25 cm, 20x28 cm): At this size (about twice the area of the S-size), the details in the print and the texture of the paper really start to stand out. These prints are ideal for hanging on the wall, best viewed from about 1 meter away. You can still store unframed prints in standard-sized albums, but they’ll also look great framed on display.
L/A3/A3+ (30cm baseline such as 30x40 cm): This is where you start to get the real “art print” experience. The larger size means the image really pops, and the details and paper make a big impact. This size is meant to be framed and viewed from up to 2 meters away, giving your space a real gallery vibe. It’s the first size where you’re guaranteed to get that “wow” feeling when you hang it up in your room. This is also the last size where we offer prints in Professional quality - prints beyond this size are only available in Premium and Prestige.
XL/A2 (40cm baseline, such as 40x50 cm): This size is common in museum exhibitions and galleries. These prints make a statement in any space but are still manageable in most homes—you can usually find space for one or two of these prints in your home. They’ll likely become a focal point in your interior and express your taste and passions.
XXL/A1 and larger: These are the breathtaking sizes and a very bold statement. Think of them as life-size prints that really take over a room. If you hang one of these, it’s probably the only print you’ll need in that space. The impact is huge—models in the photos are practically life-size, making it feel like they’ve stepped into your room. Due to their enlarged size, only a small number of images can be printed in that size and still look perfect, hence the selection if very limited. Please note, these prints might require special handling and shipping.
Print size vs frame size. All physical things take up space, and with prints, that’s an important consideration. Print size refers to the actual printed area, while frame size tells you how much space the artwork will occupy on your wall once framed. For example, a 10×15 cm print is small enough to fit in albums, shoeboxes, or stand easily on a shelf or table in a simple 10×15 frame or acrylic stand. But once it’s mounted in an A4 passepartout, it takes up much more space and requires a proper frame. Clearly, a beautifully mounted print demands more room, but it also carries far more impact than one kept tucked away in a shoebox. You’re trading compact storage for greater visibility and presence.
Once you move up to A3 size, both storage and display become more challenging. An unframed A3 print has roughly the same surface area as 8 x 10×15 cm prints. When framed, it can take up the equivalent wall space of around 12 x 10×15 cm prints. So while a dozen small prints might easily fit on a wall or in a box, a dozen framed A3 prints demand a whole lot more room and quickly become a matter of available wall space.
A2 prints are even larger - double the size of A3 and require a lot more room. Most home will only have space for a couple of A2 prints. These become the pillars of your collection, setting the tone and style for everything else around them.
A1 or larger prints are a different story altogether. These are rare, bold, and take up a lot of space. Unless you live in a mansion or have a dedicated gallery wall, it’s hard to make room for more than one. And large sizes come with their own challenges. They’re not just harder to ship—they can also be difficult to fit through elevators or doorways. So while these formats can be visually striking, they’re often impractical for most everyday living spaces. That’s part of the reason many high-end, expensive prints come in these large formats - they’re made with a specific kind of buyer in mind: institutions, galleries, or wealthy individuals with the space to properly display them. These prints aren’t just art pieces - they’re statements, often meant to dominate a room.
TIP. Before you commit to any print, consider taking a trip to your local frame store to check out the sizes of the frames in person. This will give you a much better idea of what to expect and help you visualize how different print sizes will look in your space. As print sizes increase, orientation also plays a role. Large horizontal images tend to be easier to fit than large vertical ones.
3.Passepartout and Frames
Unframed, matted, and framed prints of the same image.
We sell most of our prints mounted in a passepartout, ready to be placed in a frame of your choice. Many times, the difference between an amateur print and a professional art print is in its presentation. Passepartout is that “fancy” presentation that sets its apart from a home print. But passepartout is not just an artistic choice; it also serves a protective purpose, keeping the print safe from direct contact with the glass and helping to preserve its quality over time.
Normally, passepartout is about one size larger than the print, or have a border of about 5cm. In some cases, a passepartout two sizes up can be used, such as a 10x15 cm print matted into an A4 passepartout. This wider border, which is about 10cm, is typically used for smaller prints to give them a more “important” and focused appearance. Many museums also use oversized passepartouts, where the generous white space helps draw the viewer’s focus to the artwork and sets it apart from the surrounding wall.
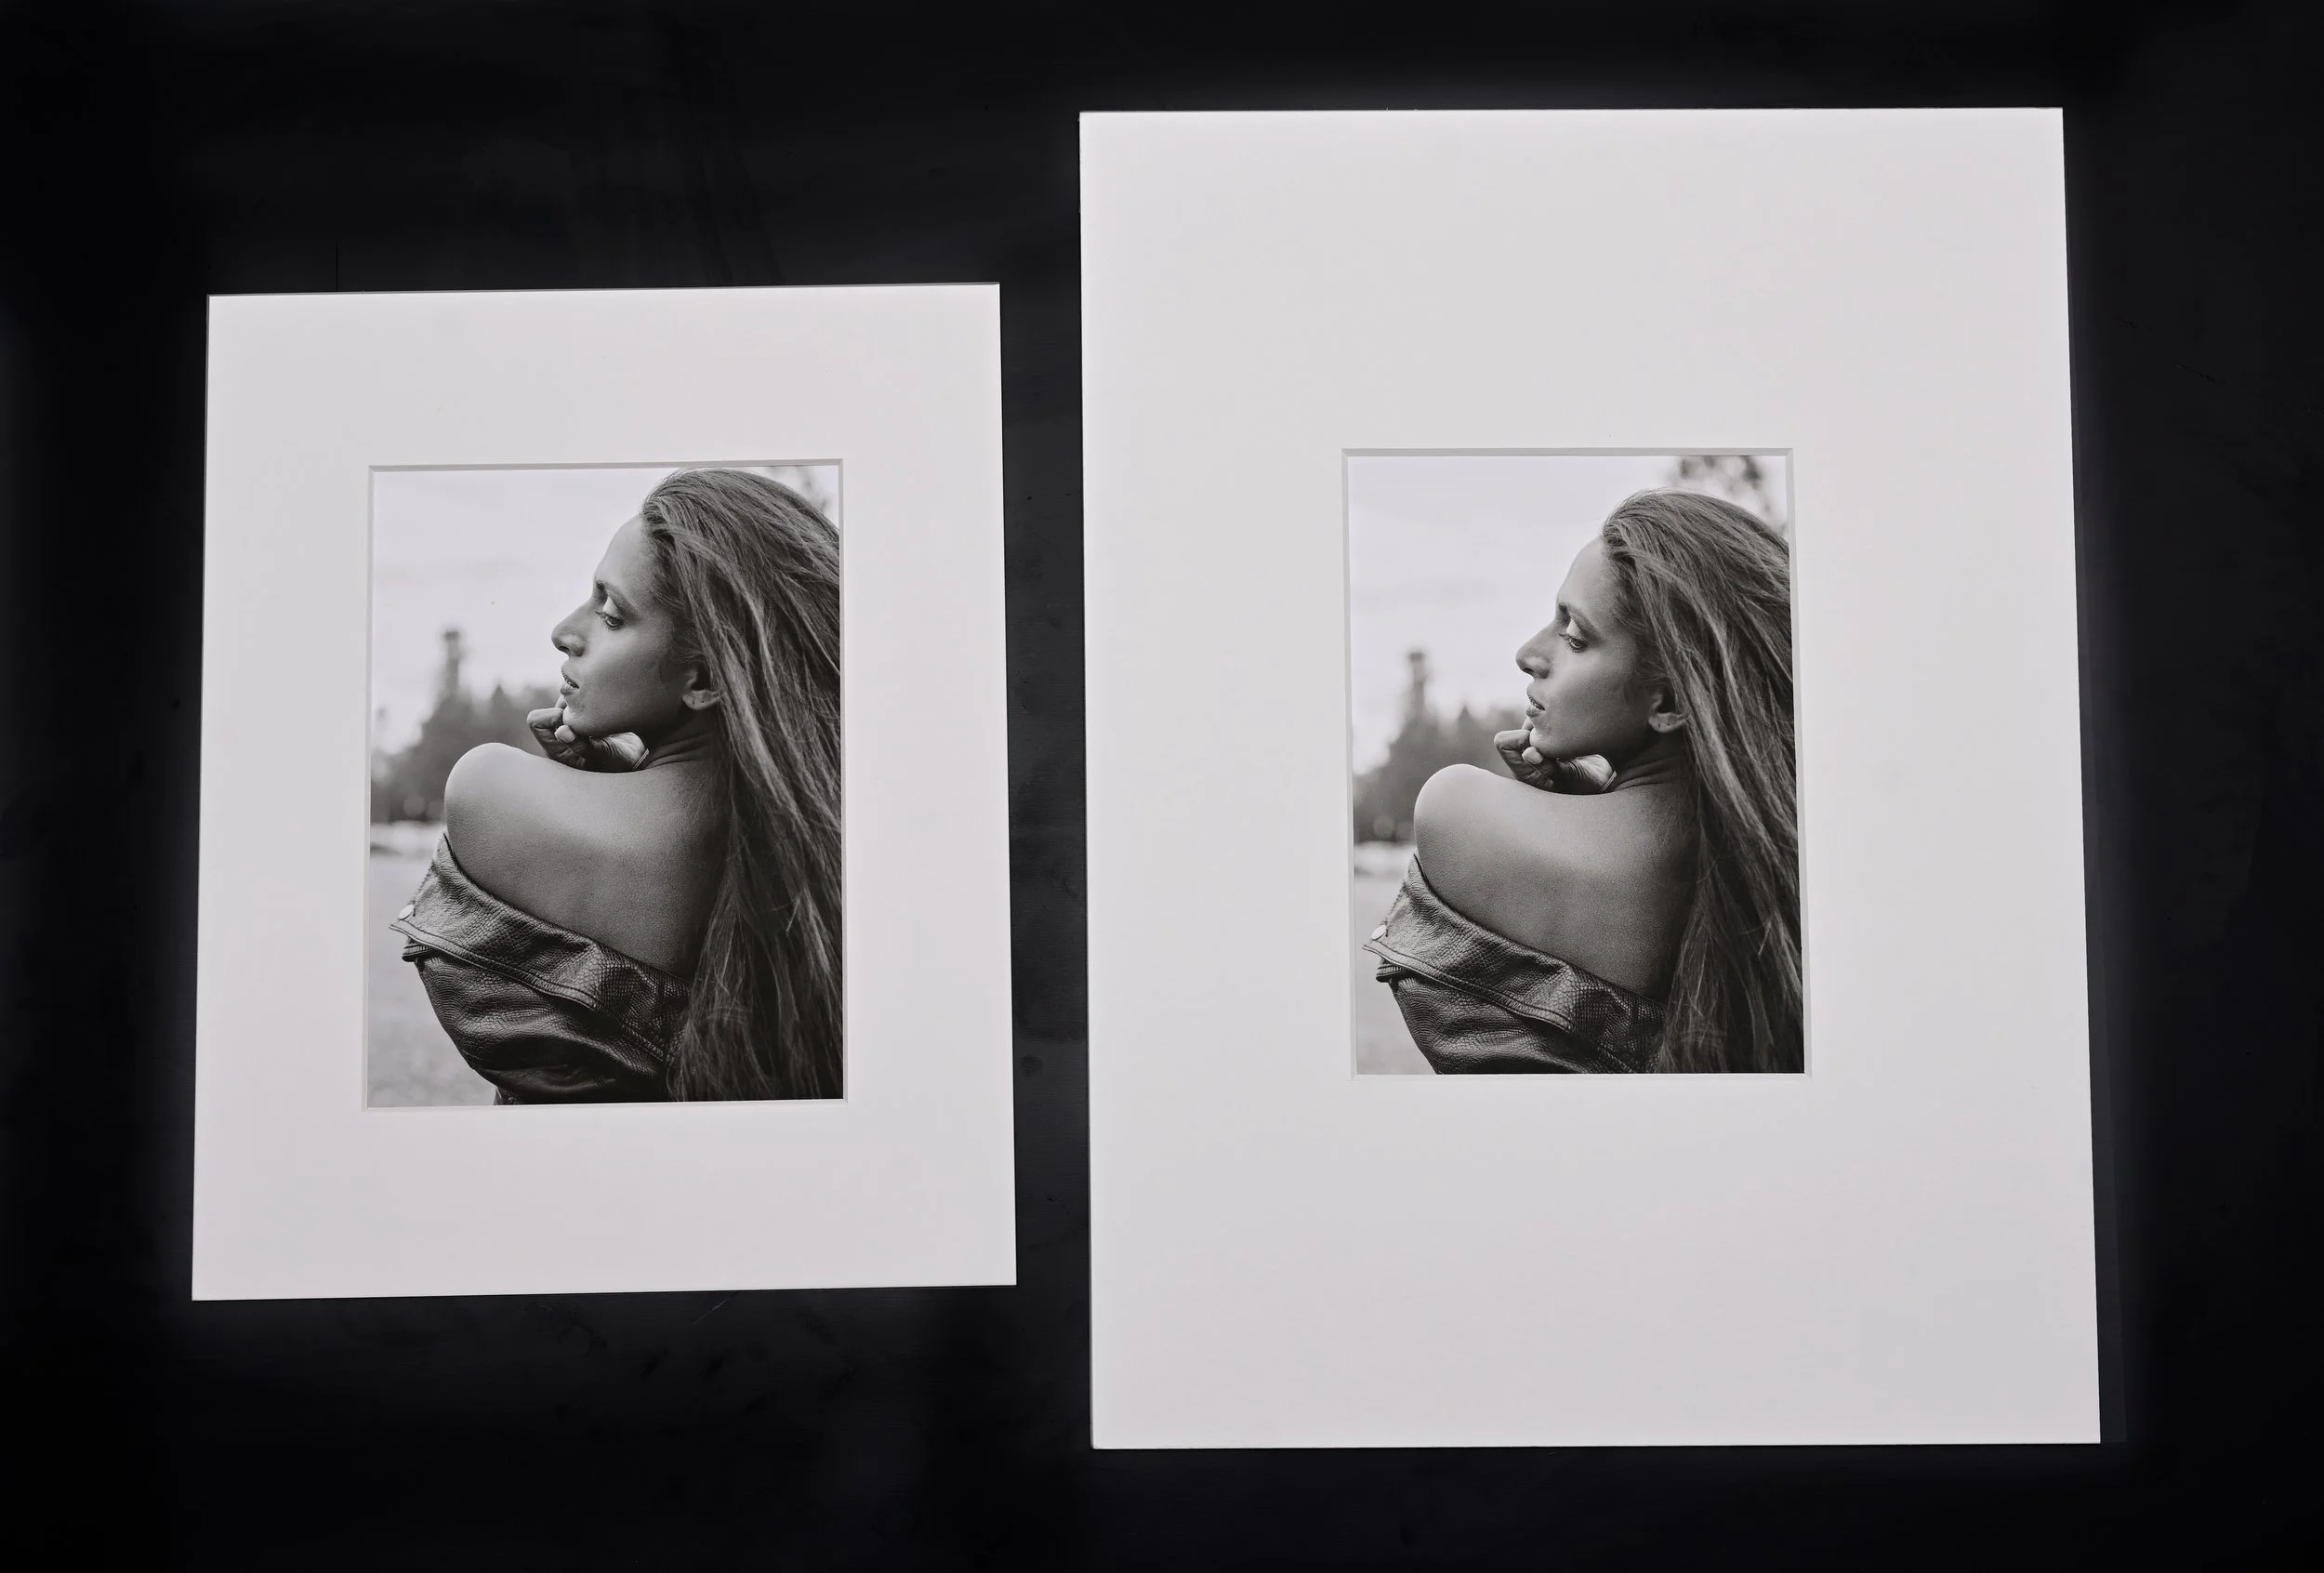
The same size image can feel very different depending on the passepartout width. A one-size-up mat with a 5cm border gives the print a clean, balanced presentation. But a two-sizes-up mat with a 10cm border creates more breathing room around the image, drawing the eye inward and giving the work a more elevated, gallery-like presence. The extra space can shift the mood from casual to refined, even when the image itself stays the same.
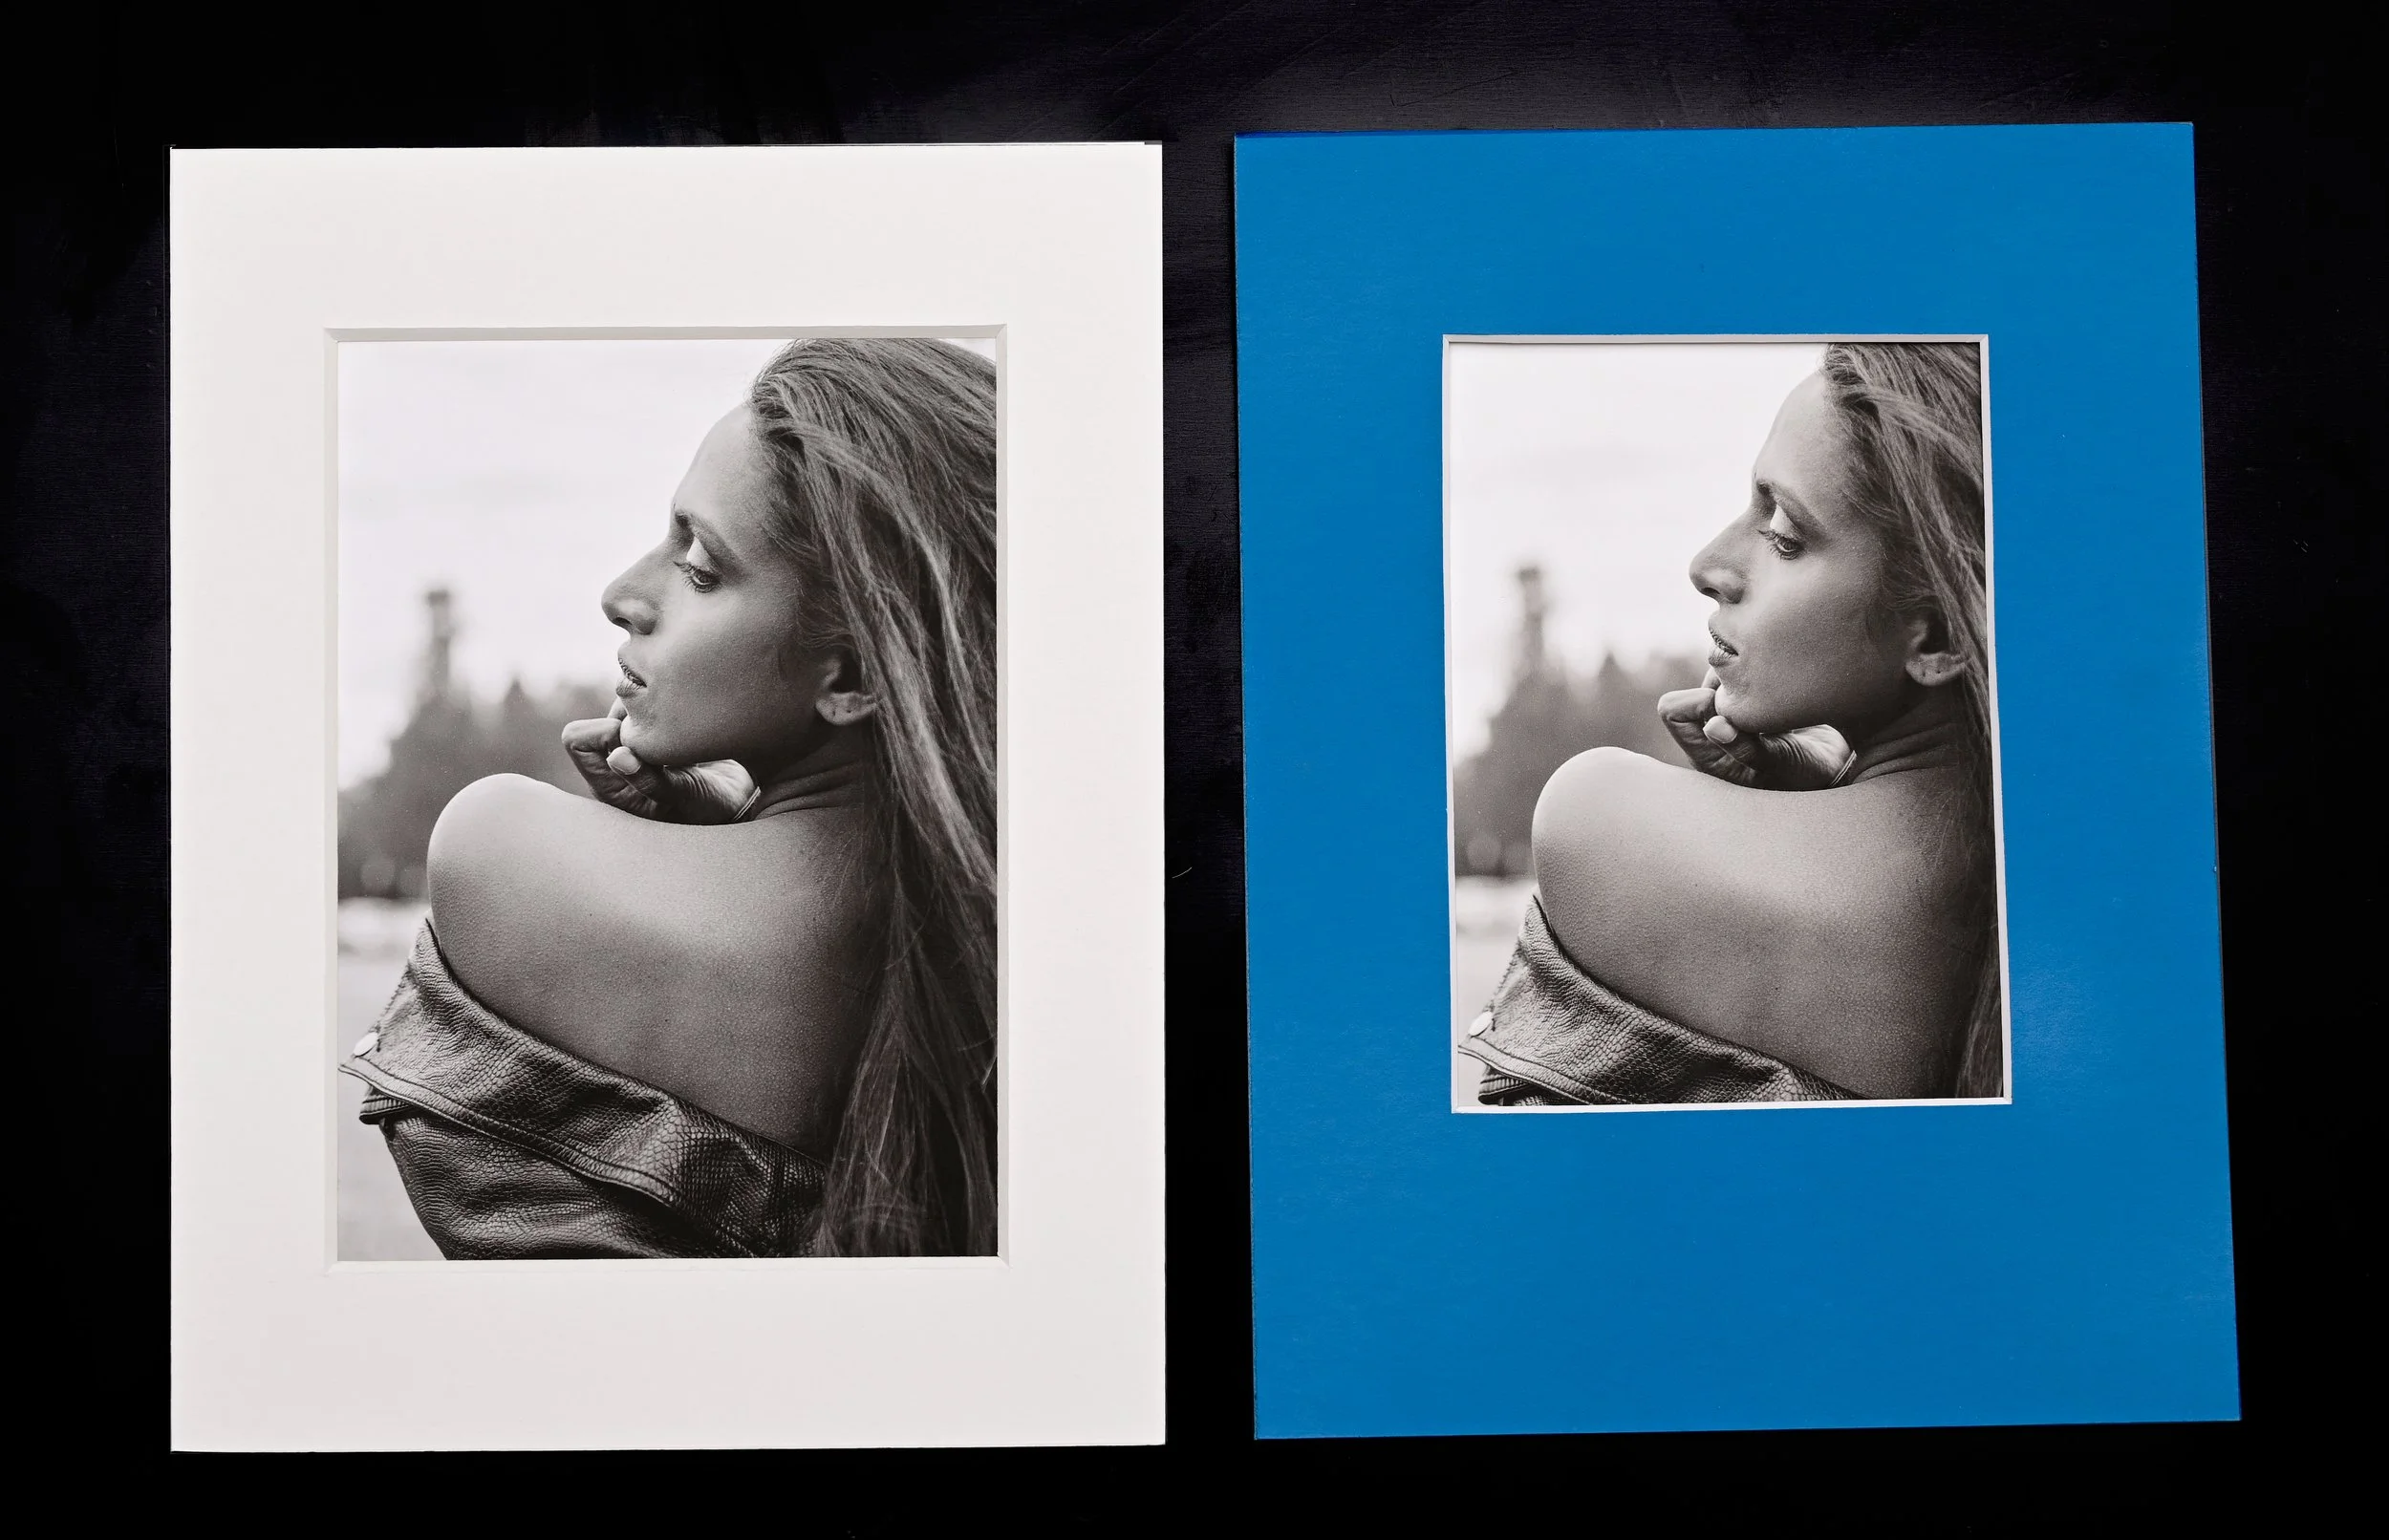
Passepartout color and framing can dramatically influence how we perceive an artwork.
Frames? We sell most of our art unframed. Many collectors already have a preferred framing style, so it doesn’t make sense for us to offer every frame for every use case. Our goal is to make high-quality nude art more affordable. By removing frames, we lower costs and pass the savings on to you. This also gives you the freedom to choose a frame that fits your space—and often at a better price than we could offer. If you are new to framing, read our guide to framing and glazing for your new art.
4.Putting it all together.
If you haven’t already, make sure to check out our full guide to buying prints once you’ve finished this article. In short, start by imagining what your ideal collection could look like. What sizes do you actually like, can afford, and have space to display? What kind of prints do you want to focus on in terms of quality, materials, and style?
Knowing these things ahead of time makes choosing much easier. Think of it like walking into a shoe store already knowing your size and what you need the shoes for—suddenly, most of what's on the shelf becomes irrelevant, and your options are clear. It might sound overly simple or a bit too practical, but it’s a helpful exercise. To get started, here are three tips that can help you in your thinking.
1.Start Small. We don’t recommend starting with the most expensive piece you can afford—it might not be what would make you happy. Just because something is premium and costly doesn’t mean you’ll fully appreciate it - you might need to grow into it. In our experience, the best way to start appreciating art prints is by acquiring smaller pieces first. Sometimes going for the highest quality small print is the smartest approach. This allows you to experience the quality of the paper and craftsmanship firsthand. If you love it, you can confidently go bigger with your next purchase selecting similar type of paper/quality level. Eventually, aim to own your largest artwork in the highest quality you can afford. Size matters, and the quality will shine and become a signature piece of your home. But do not overpay, unless you know exactly what you are getting.
To let you explore the levels and papers we offer sample print packs in XS sizes, featuring the same image printed on a variety of paper types. These sets are designed to show how the ink and image interact with different paper types, allowing you to see how each paper affects the final look and feel of the artwork. It’s a perfect introduction to the core of printing craftsmanship, helping you make more confident and informed choices as you build your art collection.
2.Have a goal for your collection. Have a plan for what you want to collect. Buying random pieces in various sizes and quality levels is rarely a good strategy. Do your research and think about the collection you want to build. Is it going to be around one specific model or photographer? Is it a special visual style that you want to focus on? Is it size, materials ore ranting technique that appeal to you? Remember—any plan is usually better than no plan at all. It’s very easy to spend a fortune on art and still end up with random pieces rather than a well thought collection. Value your time and money - take the time to plan how you want to spend them.
3.Accept that some of your initial purchases may not be your best. Most certainly, your tastes and budget sensitivity will evolve over time, and you might eventually sell or give away some of your earlier pieces. If your tastes don’t evolve, you probably didn’t buy art that truly resonates with you in the first place. The most important thing is that art should make you happy - it has no other purpose than this. But art buying is also a risk. If you find yourself constantly thinking about how much you paid for a piece, that’s usually a sign you overpaid - take it as a signal and learn from it. But if you look at it and feel like your home wouldn’t be the same without it, then you’ve probably found the right one. In that case, the feeling it gives you - the dopamine, the quiet rush every time you see it was worth every cent.In the end, art is about the journey and the personal connection it creates. It should reflect who you are, inspire you, and bring you joy.